
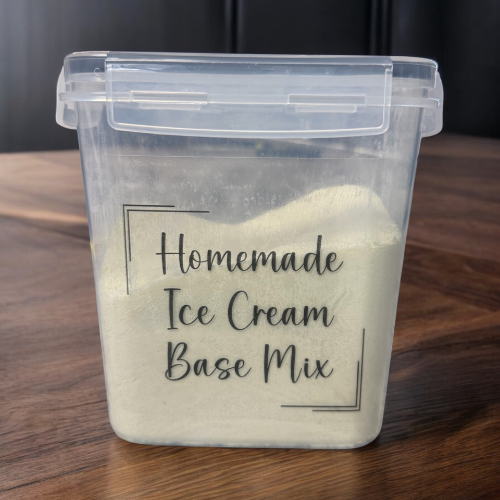
This is a jar of dry pantry mix that turns into ice cream whenever you want it. Five ingredients — powdered milk, powdered heavy cream, sugar, vanilla, and salt — measured and combined once, stored for up to six months, and ready to use anytime you combine half a cup of mix with two cups of whole milk. One jar yields seven batches of ice cream base. That’s a lot of ice cream from one afternoon of measuring.
The ingredient that makes it work as a shelf-stable mix is the powdered heavy cream. Most dry ice cream mixes use only powdered milk, which produces something icier and less rich than actual ice cream. The powdered heavy cream adds the fat content that makes the finished product genuinely creamy. It’s the difference between frozen milk and actual ice cream.
What Powdered Heavy Cream Does
Ice cream gets its creamy texture from fat. Fresh heavy cream is 36 to 40 percent fat — that fat coats the ice crystals that form during freezing and keeps them small, which produces a smooth texture rather than an icy one. Powdered heavy cream concentrates that fat content in a shelf-stable form that rehydrates when combined with liquid.
Without it, you’re essentially making frozen whole milk — which is fine but noticeably less rich and more prone to icy texture. With it, the finished ice cream has the body and mouthfeel of something made with fresh cream. It’s worth finding. Look for it online or at specialty grocery stores — it’s the ingredient most ice cream base mixes leave out.
The Vanilla
The dry mix uses vanilla bean seeds, vanilla powder, or vanilla extract — your choice. Vanilla bean seeds scraped directly into the dry mix distribute evenly and add the visible specks that signal real vanilla. Vanilla powder is the most pantry-practical since it stays dry and measures easily. Vanilla extract gets added when you’re making the ice cream base rather than into the dry mix — liquid in a dry mix causes clumping over time.
If you use vanilla bean seeds or powder in the mix, you’re set. If you use extract, add it to the warm milk mixture during the cooking step rather than to the jar.
The Salt Question
The recipe calls for a quarter teaspoon of fine salt. This came up in the comments and it’s worth addressing clearly here — the salt is in the recipe card now. Salt in ice cream does what salt does in every sweet application: it rounds the sweetness, sharpens the vanilla, and keeps the finished ice cream from tasting flat. A quarter teaspoon for seven batches is a tiny amount per serving. Don’t skip it.
Making the Ice Cream Base
Combine half a cup of the dry mix with two cups of whole milk in a medium saucepan. Cook over medium heat, whisking constantly, until the mixture is warm and the sugar is fully dissolved — about 3 to 4 minutes. Don’t let it boil. Remove from heat.
If you’re adding a flavoring beyond vanilla — cocoa powder for chocolate, espresso powder for coffee, fruit puree for a fruity version — stir it in now while the mixture is still warm. Start with a quarter to half a cup of mix-ins and adjust to taste.
Let the mixture cool to room temperature, then refrigerate for at least 2 hours until thoroughly chilled. The base must be cold before churning — warm base in an ice cream maker produces icy, poorly textured ice cream.
Ice Cream Maker vs. No-Churn
With an ice cream maker: churn the chilled base according to your machine’s instructions. Most home machines take 20 to 25 minutes to produce a soft-serve consistency. Transfer to a container and freeze 2 to 3 hours for a firmer scoop.
Without an ice cream maker: pour the chilled base into a shallow baking dish and freeze. Every 30 minutes for 2 to 3 hours, pull it out and stir vigorously with a fork to break up the ice crystals as they form. This process — called the Italian granita method — produces a scoopable texture without a machine. It takes more attention but works well, especially for a mini freezer or small kitchen setup.
A mini ice cream maker handles this base perfectly. Fill it no more than two-thirds full since the mix expands slightly as it churns.
Flavor Variations
Chocolate: whisk in 3 tablespoons of Dutch-process cocoa powder to the warm base. Taste and adjust — more cocoa for a deeper chocolate flavor, a tablespoon of sugar if it needs balancing.
Coffee: stir in 1 to 2 teaspoons of instant espresso powder. The coffee flavor deepens as the ice cream sets in the freezer, so start with less than you think you need.
Strawberry: blend half a cup of fresh or frozen strawberries into a smooth puree and stir into the warm base. Strain if you want a smooth ice cream; leave it as-is for a fruit-forward version with texture.
Cinnamon brown sugar: add a teaspoon of cinnamon and substitute a quarter cup of brown sugar for part of the granulated sugar in the base. Warm, fall-adjacent, excellent with pecans stirred in during the last few minutes of churning.
Mix-Ins
Add mix-ins during the last 2 to 3 minutes of churning — chocolate chips, crushed cookies, chopped nuts, caramel bits, freeze-dried fruit. Added earlier they get pulverized by the churn; added too late they don’t distribute evenly. The last few minutes is the sweet spot.
For no-churn versions, fold mix-ins into the ice cream after the final stir before the last freeze cycle.
Gifting
A pint jar of this mix with a tag listing the use ratio (half a cup mix to two cups whole milk) and a few flavor variation ideas is a practical, thoughtful gift for anyone who owns an ice cream maker or wants to try no-churn ice cream. Package with a bag of mix-ins — chocolate chips, a small jar of caramel sauce, or freeze-dried strawberries — for a complete ice cream night kit.
Storage
Dry mix: sealed jar in a cool dry pantry for up to 6 months. Keep away from humidity — the powdered dairy ingredients can clump if exposed to moisture. If the jar has clumped, break it up before measuring; the flavor isn’t affected.
Finished ice cream: airtight container in the freezer for up to one week. Press a piece of plastic wrap directly onto the surface of the ice cream before sealing to prevent ice crystals from forming on top.
If you’re building out your pantry dessert mix collection, the Homemade Instant Vanilla Pudding Mix — thisoldbaker.com/instant-vanilla-pudding-mix and the Sweetened Condensed Milk Mix — thisoldbaker.com/sweetened-condensed-milk-mix both live in the same pantry category and are worth keeping alongside this one.
Frequently Asked Questions
What is in a homemade ice cream base mix?
This dry ice cream base mix contains powdered whole milk, powdered heavy cream, granulated sugar, vanilla (bean seeds, powder, or extract), and a small amount of salt. The powdered heavy cream is the key ingredient that separates this from a basic powdered milk mix — it provides the fat content that makes the finished ice cream genuinely creamy rather than icy.
Do I need an ice cream maker to use this mix?
No — a no-churn method works. After preparing and chilling the base, pour it into a shallow baking dish and freeze. Every 30 minutes for 2 to 3 hours, stir vigorously with a fork to break up forming ice crystals. This produces a scoopable texture without any machine. A mini ice cream maker also works well with this base — fill no more than two-thirds full.
How much mix do I use per batch of ice cream?
Half a cup of dry mix combined with 2 cups of whole milk makes one batch of ice cream base, which produces approximately 2½ to 3½ cups of finished ice cream depending on what mix-ins you add. One full jar of mix yields approximately 7 batches.
Why does the base need to chill before churning?
The ice cream maker works by freezing the base as it churns — if the base goes in warm, the machine has to do too much work cooling it down and the result is icy rather than creamy. A properly chilled base (at least 2 hours in the refrigerator, or overnight) produces significantly better texture. The base can be made the night before and churned the next day.
Can I make this ice cream base mix dairy-free?
Yes — substitute coconut milk powder for the powdered whole milk and a plant-based powdered creamer for the powdered heavy cream at the same ratios. At cook time, use full-fat coconut milk or oat milk in place of whole milk. The finished ice cream will have a slightly different flavor profile — coconut milk version has a mild tropical undertone — but produces a genuinely creamy texture because of the fat content in full-fat coconut milk.
Can I make this sugar-free?
Yes — substitute allulose for the granulated sugar at a 1:1 ratio. Allulose dissolves well, doesn’t crystallize in the freezer, and produces a clean result without aftertaste. Monk fruit and erythritol blends also work. Avoid straight stevia — the aftertaste is too prominent in a dairy-based mix.
Homemade Ice Cream Base Mix
Ingredients
- 2 cups powdered milk
- 1 cup granulated sugar
- 1/2 cups powdered heavy cream
- 1 Vanilla bean seeds scraped or 1 tablespoon vanilla powder or 1 tablespoon of vanilla extract, added when making the ice cream.
- 1/4 tsp salt
Instructions
- In a large bowl, whisk together the powdered milk, sugar, powdered cream, vanilla bean and salt until well combined. Transfer the mix to an airtight container. Store in a cool, dry place for up to 6 months.
- Instructions for Making the Ice Cream: In a medium saucepan, combine 1/2 cups of the ice cream mix with 2 cups of whole milk. Cook over medium heat, whisking constantly, until the mixture is warm and the sugar is dissolved. If you didn’t use vanilla bean seeds, add 1 tablespoon vanilla extract at this step.
- For other flavors, you can add ingredients like cocoa powder, fruit puree or coffee. Start with 1/2 cup and adjust to taste. Remove the mixture from heat and let it cool to room temperature. Refrigerate for at least 2 hours or until thoroughly chilled. If you have an ice cream maker, churn according to the manufacturer's instructions. If you don't have an ice cream maker, pour the mixture into a shallow dish and place it in the freezer. Stir the mixture every 30 minutes until it reaches a soft serve consistency (about 2-3 hours). Serve immediately for soft serve ice cream or freeze for an additional 2-3 hours for a firmer texture.
- Store the ice cream in an airtight container in freezer for up to 1 week. Customize your ice cream by adding mix-ins like chocolate chips, nuts or fruit during the last few minutes of churning.


Leave a Reply