
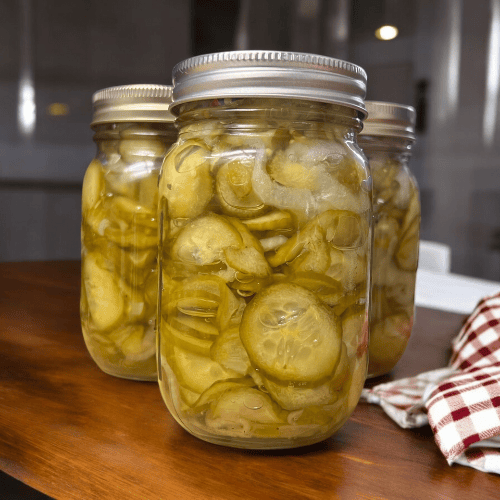
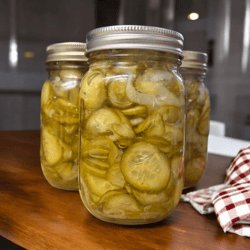
Few things evoke the taste of summer quite like the crisp, sweet tang of homemade bread and butter pickles. These timeless pickles, with their vibrant yellow hue and perfect balance of sweetness and acidity, have graced countless picnic tables, potlucks, and family gatherings. Whether you’re a seasoned canner or a novice looking to preserve the bounty of your garden, water bath canning is a straightforward and rewarding way to create these delightful pickles that can be enjoyed year-round.
Why Bread and Butter Pickles?
The origin of bread and butter pickles dates back to the early 20th century when cucumbers were plentiful, and preserving them was a necessity. Their unique name is believed to have come from farmers who traded these pickles for essential staples like bread and butter. Today, they remain a favorite, celebrated for their sweet and tangy flavor that pairs beautifully with everything from burgers and sandwiches to charcuterie boards and salads.
What sets bread and butter pickles apart is their distinctive flavor profile, achieved by combining cucumbers with a brine made of vinegar, sugar, and spices. This balance of flavors makes them a versatile condiment that adds a pop of zest to any dish.
The Basics of Water Bath Canning
Water bath canning is a tried-and-true method for preserving high-acid foods like pickles, jams, and fruit preserves. It’s a relatively simple process that involves submerging jars filled with your prepared food into boiling water to create a vacuum seal. This seal not only keeps your pickles fresh but also ensures they’re safe for long-term storage.
For bread and butter pickles, the process starts with slicing cucumbers and onions, preparing a flavorful brine, and then packing the ingredients into sterilized jars. The jars are then processed in a boiling water bath for a specific amount of time, depending on your altitude and jar size. Once cooled, the jars create a vacuum seal, preserving the pickles for months to come.
Key Ingredients for Success
While bread and butter pickles are simple to make, the quality of your ingredients plays a crucial role in the final product. Here are a few tips to ensure success:
- Choose the Right Cucumbers: Pickling cucumbers, often referred to as Kirby cucumbers, are ideal for this recipe. Their small size, firm texture, and thin skin make them perfect for pickling. Look for fresh, unblemished cucumbers for the best results.
- Use Fresh Spices: Make sure your spices are fresh and aromatic to enhance the taste of your pickles.
- Opt for High-Quality Vinegar: The tanginess of bread and butter pickles comes from the vinegar used in the brine. White vinegar is commonly used for its clean, sharp flavor, but apple cider vinegar can add a subtle fruity note if you prefer.
- Sterilize Your Jars: Proper sterilization is key to safe canning. Wash your jars, lids, and rings in hot, soapy water and then sterilize them in boiling water or a dishwasher with a sterilization setting.
The Joy of Preserving
Making bread and butter pickles through water bath canning is more than just a kitchen project—it’s a way to connect with tradition and savor the flavors of the season. The process is meditative and deeply satisfying, offering a sense of accomplishment as you line up jars of golden pickles on your countertop, ready to be stored or gifted to friends and family.
Homemade pickles also make thoughtful gifts. Tied with a simple ribbon or tucked into a gift basket, a jar of bread and butter pickles carries a personal touch that store-bought items simply can’t replicate. They’re a delicious way to share the fruits of your labor and spread a little joy.
Storage and Shelf Life
Once your jars of bread and butter pickles have cooled and the seals have been verified, they can be stored in a cool, dark place like a pantry or cupboard. Properly processed pickles can last for up to a year, making them a wonderful way to enjoy the taste of summer even in the depths of winter.
However, it’s essential to follow safe canning practices. Always check for a proper seal before storing your jars. If a jar didn’t seal properly during the water bath process, simply refrigerate it and enjoy the pickles within a few weeks.
Embracing Creativity
One of the joys of making bread and butter pickles is the opportunity to customize them to your taste. Love a little heat? Add some red pepper flakes to the brine. Prefer a hint of garlic? Toss in a clove or two. You can even experiment with additional vegetables like bell peppers or carrots to create a colorful medley of pickled delights.
The Rewards of Homemade Pickles
There’s something undeniably special about opening a jar of homemade bread and butter pickles. The crisp texture, the burst of flavor, and the knowledge that you created them with your own hands make every bite more enjoyable. Whether you’re topping a burger, adding them to a charcuterie board, or simply snacking on them straight from the jar, these pickles are a testament to the magic of preserving.
Water bath canning may take a bit of time and effort, but the results are more than worth it. So, gather your cucumbers, roll up your sleeves, and dive into the world of homemade pickles. It’s a tradition that’s as rewarding as it is delicious.
Looking for more homemade seasoning ideas? Check out my Sloppy Joe Seasoning or Spaghetti Seasoning for more inspiration.
Bread and Butter Pickles

Ingredients
- 3 cups distilled white vinegar 5%
- 2 cups water
- 2 cups granulated sugar
- 1½ tsp celery seed
- 2 tsp mustard seed
- ½ tsp red pepper flakes
- ½ tsp turmeric
- 4 –6 whole cloves optional but traditional
Instructions
- Prepare the cucumbers. Cut ¹⁄₁₆-inch off the blossom end of each cucumber and discard. Cut into ¼-inch slices. Combine cucumbers, onion, and salt in a large bowl. Mix to combine and cover with ice cubes. Refrigerate for 4 hours, adding more ice as needed. Then, drain the cucumbers and onions.
- Prepare the water bath. Get ready 8 pint jars, lids, and rings.
- Prepare the brine. In a 4-quart kettle, combine the vinegar, water, sugar, turmeric, cloves, celery seed, mustard seed, and red pepper flakes. Stir to dissolve the sugar and bring to a boil. Reduce to a simmer to keep the brine warm.
- Prepare the jars. Pack sterilized jars with drained cucumbers and onions, leaving ½-inch headspace. Pour brine over prepared cucumbers and onions, still leaving that ½-inch headspace. Wipe the rims of the jars with a clean cloth to remove any drips. Place on lids and rings, tightening to fingertip tightness.
- Place jars in the boiling water bath. Bring back to a boil and boil for 10 minutes. Check with the USDA canning guide and adjust the processing time for altitude.
- Remove from the water bath and cool for 12 to 24 hours. Remove rings to ensure a good seal and store for up to one year.


Leave a Reply