
DIY Soft Scrubbing Cleanser is the kind of thing our grandmothers kept under the kitchen sink—not because it was trendy or eco-conscious, but because it worked. Before chemical-laden sprays and blue gel potions lined grocery store shelves, women cleaned their homes with a handful of pantry staples, a little elbow grease, and a whole lot of know-how. And frankly? They had it right.
We’re living in an age where we’ve been taught to fear germs while simultaneously cluttering our homes with products we can’t pronounce. It’s no wonder many of us are returning to the wisdom of generations past. From sourdough starters to pantry mixes, and yes—even homemade cleaning products—there’s a renewed love for what’s simple, sustainable, and rooted in tradition.
A DIY soft scrubbing cleanser isn’t just about sparkle—it’s about intention, heritage, and stripping away the nonsense to get back to what really works.
A Little Elbow Grease and a Lot of Tradition
Let’s be clear: there’s nothing soft about the results of a DIY soft scrubbing cleanser. This gritty-but-gentle miracle paste has been a staple in homes long before “non-toxic” became a buzzword. It was used to scour sinks, polish stove tops, clean grimy tubs, and restore everything from enamel to stainless steel—all without the stinging scent of synthetic cleaners or eye-watering chemicals.
If you grew up watching a grandma clean her porcelain sink until it practically gleamed, odds are she wasn’t using a name-brand scrub. She probably had a well-worn mason jar with a mix of baking soda, salt, and maybe a splash of vinegar or soap—stirred with a butter knife and slapped onto whatever needed scrubbing.
That’s the spirit we’re channeling here.
Why Go Homemade?
The reasons for making your own soft scrub run deep—and not just in your drainpipes.
1. Safe for Your Home (and Family)
Unlike many commercial cleaners, a DIY soft scrubbing cleanser doesn’t rely on harsh acids, bleach, or ammonia. That makes it ideal for households with kids, pets, or anyone with sensitivities. You get real cleaning power without the chemical cloud that usually comes with it.
2. Low Cost, High Impact
Chances are, you already have most of the ingredients in your kitchen. A handful of baking soda and a splash of castile soap or dish detergent can go a long way. No special trips. No $8 designer cleaners in glass spray bottles. Just basics, done right.
3. Eco-Friendly and Waste-Free
Skip the plastic bottles, mystery ingredients, and long ingredient lists. When you make your own scrub, you control everything that goes into it—and more importantly, everything that goes down the drain. That’s less environmental impact and less packaging waste.
4. It Just Works
From soap scum to cooked-on gunk, a good DIY soft scrub gets into those stubborn spots without scratching or damaging surfaces. Use it on sinks, tubs, stovetops, grout, and more—it’s especially good for those places that look “clean enough” until you hit them with the real stuff.
The Power of Simplicity
At This Old Baker, we believe in the beauty of old-school solutions. There’s something satisfying about mixing up your own DIY soft scrubbing cleanser and knowing exactly what’s in it. You can customize it to your liking—add essential oils for scent, a pinch of salt for extra grit, or keep it ultra-simple and unscented.
The real charm? It connects you to the way things used to be done. There’s an inherent sense of pride in using homemade tools for homemaking. It’s slower, more mindful, and often more effective.
Cleaning becomes less about chemical warfare and more about restoration. It’s wiping away the grime while tapping into a rhythm that’s been passed down through generations.
Tips for Using a DIY Soft Scrubbing Cleanser
If you’re new to homemade cleaners, don’t worry—it’s incredibly easy to use and surprisingly versatile. Here’s how to make the most of it:
- Apply with a damp cloth or sponge – Scoop a bit of scrub onto a cloth and gently work it into the surface. It should feel gritty, not gooey.
- Let it sit for stubborn stains – Give it a few minutes on tougher spots like baked-on food or hard water rings before wiping clean.
- Avoid on delicate finishes – While it’s non-toxic and gentle, skip it on natural stone like marble or granite to avoid scratching or dulling.
- Use it weekly for maintenance – A quick once-over with soft scrub in sinks, around drains, and on your stovetop keeps buildup at bay and makes deep cleaning a breeze.
A Cleaner Home with a Clear Conscience
In a world full of fast fixes and heavily marketed solutions, going back to basics feels downright rebellious. But making your own DIY soft scrubbing cleanser isn’t just about being “natural”—it’s about taking ownership of what’s in your home.
You’re not just cleaning—you’re reclaiming a lost art.
There’s pride in mixing your own cleaners. There’s a deep satisfaction in scrubbing your sink and knowing you made it shine with ingredients you trust. And there’s power in embracing the slower, more intentional rhythm of homemaking that isn’t just about keeping things tidy—but about honoring the space you live in.
Final Thoughts: A Little Vintage, A Lot Effective
A DIY soft scrubbing cleanser might seem like a small thing, but it’s part of a much bigger picture. It’s part of choosing simple over synthetic, useful over trendy, and timeless over disposable. It’s a nod to the women who cleaned before us—not because they had to, but because they knew how.
And now you do too.
So next time you go to clean the sink, skip the store-bought stuff and reach for your own mix instead. Let the scent of baking soda and simplicity remind you: homemade isn’t just a trend—it’s a tradition.
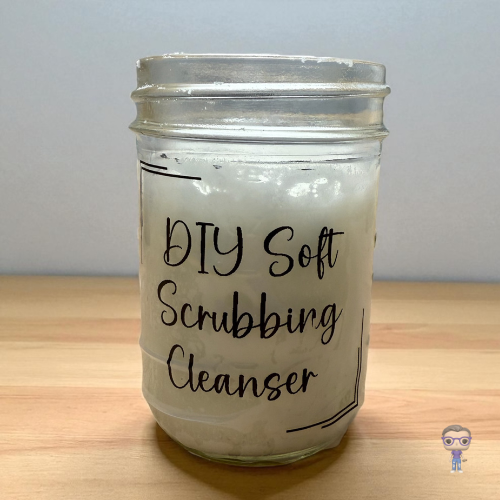
DIY Soft Scrubbing Cleanser
Ingredients
- ¾ cup baking soda
- 1/4 cup liquid castile soap
- tbsp water adjust for desired texture
- 10 drops essential oil optional – tea tree, lemon, lavender, or eucalyptus are great choices
Instructions
- Combine** baking soda and castile soap in a small bowl or jar.
- **Add** water gradually to form a paste (you can thicken or thin it based on your preference).
- **Store** in a lidded jar or squeeze bottle.
- **To Use:**
- – Scoop or squeeze a small amount onto a sponge or cloth.
- – Scrub the surface and rinse with warm water.
- – For stubborn stains, let it sit for 5–10 minutes before rinsing.


Leave a Reply