

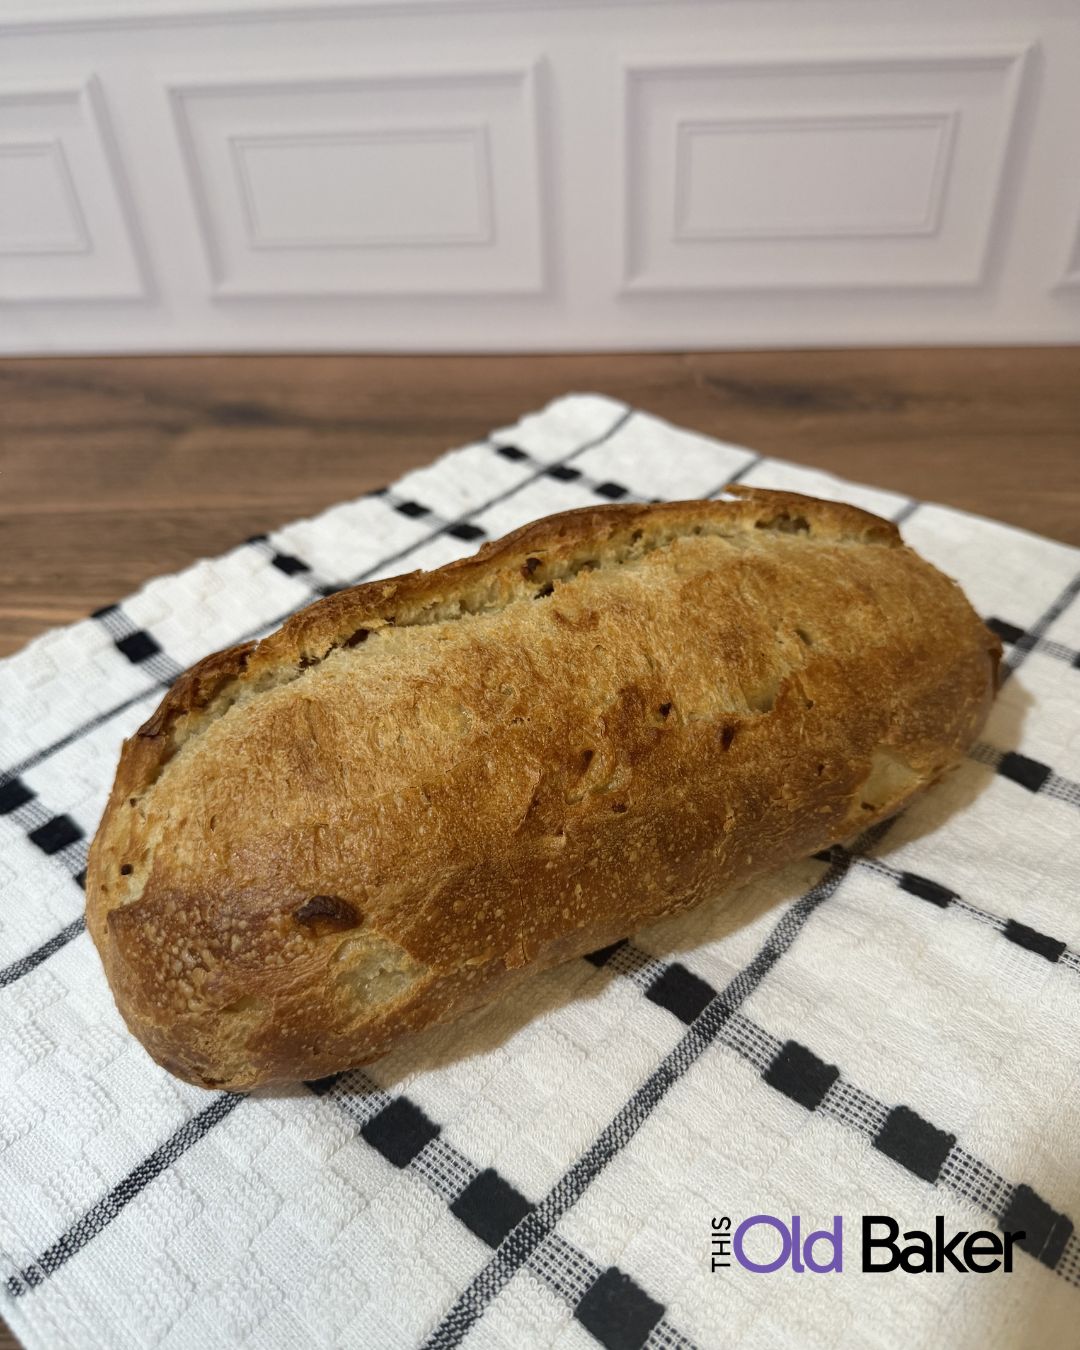
This is not garlic bread in the way most people mean it — a baguette with garlic butter spread on top and run under the broiler. This is a yeasted artisan loaf with roasted garlic paste, rosemary, parsley, and Parmesan worked directly into the dough itself. The garlic flavor is in every bite, not just on the surface. The herbs are baked into the crumb. The crust is deep golden and crackles when you cut into it.
It takes the better part of an afternoon — the garlic roasts for 40 minutes, the dough rises twice, the loaf bakes for 35 to 40 minutes — but the active work is maybe 30 minutes total. The rest is time. And the result is bread that tastes like you bought it somewhere in Florence and carried it home wrapped in paper.
What Roasting Does to Garlic
Raw garlic is sharp, pungent, and assertive. When you roast an entire head wrapped in foil at 400°F for 35 to 40 minutes, something fundamental changes. The heat converts the harsh sulfur compounds that give raw garlic its bite into sweeter, more complex molecules. The cloves caramelize slightly in their papery skins, turning soft and golden and spreadable. The flavor transforms from sharp and aggressive to sweet, mellow, and deeply savory — with none of the raw garlic harshness.
That transformation is the whole flavor story of this bread. Mashed roasted garlic paste worked into yeasted dough produces bread that tastes unmistakably garlicky but not sharp — warm and complex and savory in a way that raw garlic stirred into dough never achieves.
Roast the garlic first, before you do anything else. It needs 35 to 40 minutes at 400°F and it needs time to cool enough to handle. While it roasts, measure the dough ingredients. By the time the garlic is cool enough to squeeze from the skins, everything else is ready.
The Dough
Bread flour rather than all-purpose is specified for a reason — bread flour has a higher protein content, which produces more gluten when kneaded, which produces a chewier, more structured crumb with better rise. All-purpose flour works but produces a softer, less chewy loaf. For a Tuscan-style artisan bread where you want some bite and chew in the crumb, bread flour is the right choice.
Honey activates the yeast and adds a faint sweetness that rounds the flavor of the finished loaf without making it taste sweet. At one tablespoon for a 3½-cup-flour loaf, it’s below the threshold of tasting like honey bread — it’s just making everything taste slightly more complete.
The yeast goes into warm water — 105 to 110°F, warm to the touch but not hot. Five to ten minutes until foamy. If it’s not foamy, the yeast is dead or the water was the wrong temperature. Start over. A failed proof is the only thing that produces a flat, dense loaf, and catching it at this stage saves the whole recipe.
Working In the Roasted Garlic
The mashed roasted garlic paste, rosemary, parsley, Italian seasoning, and Parmesan all go into the wet ingredients before the flour starts going in. This distributes them evenly through the dough from the start rather than trying to fold them into an already-formed dough, which produces uneven pockets. By the time the flour is incorporated and the dough is kneaded, the garlic and herbs are thoroughly distributed through every part of the loaf.
Mash the roasted garlic cloves into a smooth paste rather than leaving them in whole pieces. Whole roasted garlic cloves in bread dough produce large pockets of garlic that are excellent in some applications but disruptive in a smooth yeasted loaf — the paste incorporates smoothly and seasons throughout.
Kneading
Eight to ten minutes by hand on a lightly floured surface, or five to six minutes with a dough hook in a stand mixer. The dough is ready when it’s smooth and elastic — when you poke it, it springs back slowly. A sticky dough that tears rather than stretching needs more kneading. An overly stiff dough means too much flour was added during kneading; try to resist adding flour unless the dough is genuinely unworkable.
The olive oil in the dough keeps it from being too sticky and contributes to a softer crumb and a slightly golden crust. Don’t skip it.
The Two Rises
First rise: 60 to 90 minutes in a lightly oiled bowl, covered, until doubled. The dough should look visibly puffier and feel lighter and airier than when it went in. Press two fingers an inch into the dough — if the indentation fills back in slowly, it’s ready. If it springs back immediately, give it more time. If it doesn’t spring back at all, it’s over-proofed.
Shape into a round boule or oval bâtard — a boule is a classic round loaf, a bâtard is an elongated oval that slices more easily for serving alongside soup or pasta. Both shapes work equally well for this recipe.
Second rise: 30 to 45 minutes after shaping. The loaf won’t double again — it should look noticeably puffier and feel slightly airy when gently pressed. Don’t rush this rise; an under-proofed shaped loaf produces a dense interior.
Slashing and Baking
Slash the top of the loaf two to three times with a sharp knife or bread lame just before it goes in the oven. The slashes aren’t decorative — they control where the loaf expands during baking. Without them, the bread will burst randomly at its weakest point, producing an uneven shape. With them, the bread opens predictably along the scores and rises evenly.
The egg wash is optional but produces a noticeably shinier, deeper golden crust. One egg beaten with a tablespoon of water, brushed on gently just before baking. Don’t press down on the loaf while brushing — use light strokes so you don’t deflate the final rise.
375°F for 35 to 40 minutes until deep golden brown. The definitive test: internal temperature of 195 to 200°F on an instant-read thermometer inserted in the center of the bottom. Color can be misleading — a loaf can look done on the outside while the inside is still gummy. The thermometer removes all guesswork.
The Dutch Oven Method — Worth Doing
If you have a Dutch oven, use it. Place it in the oven as it preheats so the pot is hot before the dough goes in. Lower the shaped and scored loaf into the hot Dutch oven using parchment paper as a sling. Cover and bake at 450°F for 25 minutes — the covered environment traps steam released by the dough, which keeps the crust soft and extensible during the initial oven spring so the bread can expand fully. Remove the lid and bake another 10 to 15 minutes until deep golden.
The Dutch oven method produces an artisan-quality crust — crackly, deeply colored, with a blistered surface that a standard baking sheet in a home oven doesn’t achieve. The steam is the difference. If you have the option, it’s worth the extra step.
The Butter Finish
Brush the warm loaf with melted butter or olive oil the moment it comes out of the oven. The crust is still hot and slightly porous at that point and absorbs the butter immediately, adding richness to the crust and deepening the color. Flaky sea salt scattered on top while the butter is wet adheres and stays rather than sliding off. A handful of fresh chopped parsley on top is optional and purely visual, but it signals to anyone looking at the loaf that it has herbs in it.
The 30-Minute Wait
Do not slice for at least 30 minutes after it comes out of the oven. Hot bread slices badly — it tears, it compresses, and the steam inside hasn’t finished redistributing through the crumb. The 30-minute rest is when the interior finishes setting up into the texture you actually want. It’s also when it smells the best, which is its own reward.
What to Serve It With
Olive oil and balsamic vinegar for dipping — the classic, and genuinely excellent with this loaf. Alongside any pasta dish. With [LINK: Italian Grinder Sliders — thisoldbaker.com/italian-grinder-sliders/] instead of the standard dinner roll. Torn into pieces and used to mop up soup — this bread and a bowl of something deeply flavored is dinner that requires nothing else.
Variations
Parmesan Asiago: fold in half a cup of shredded Parmesan or Asiago with the wet ingredients. The extra cheese melts into the crumb and produces a more savory, slightly tangy interior.
Sun-dried tomato: add two tablespoons of finely chopped sun-dried tomatoes in oil with the garlic paste. The tomatoes add concentrated sweetness and acidity that plays well against the rosemary.
Extra rosemary: double the rosemary for a more assertive herb flavor. Rosemary and roasted garlic is one of the great flavor combinations in bread baking — the combination deepens with baking in a way that neither ingredient achieves alone.
Storage
Airtight bag at room temperature for up to three days. The crumb stays soft but the crust softens over time — if you want the crust to stay crackly, store uncovered or in a paper bag rather than plastic. Freeze whole or sliced for up to three months. Frozen slices toasted directly from frozen are genuinely good and one of the better arguments for making a full loaf.
Frequently Asked Questions
What makes Tuscan garlic bread different from regular garlic bread?
Tuscan garlic bread is a yeasted artisan loaf with roasted garlic paste, rosemary, parsley, and Parmesan worked directly into the dough — not a pre-baked bread with garlic butter spread on top. The garlic flavor is in every part of the crumb rather than just on the surface. Roasting the garlic before adding it to the dough transforms it from sharp and pungent to sweet, mellow, and deeply savory.
Why do you roast the garlic instead of using raw garlic?
Roasting an entire head of garlic at 400°F for 35 to 40 minutes converts the sharp sulfur compounds in raw garlic into sweeter, more complex molecules. The cloves caramelize and become soft, golden, and spreadable. The flavor changes from sharp and assertive to sweet, mellow, and deeply savory — with none of the raw garlic bite that would be overwhelming in bread dough. Roasted garlic paste produces bread that tastes unmistakably garlicky but warm and complex rather than sharp.
Can I use all-purpose flour instead of bread flour?
Yes — all-purpose flour works but produces a softer, less chewy loaf than bread flour. Bread flour has higher protein content which produces more gluten when kneaded, which means more chew and structure in the finished crumb. For an artisan-style Tuscan loaf where you want some bite, bread flour produces the better result. If all-purpose is all you have, the bread is still good — just slightly softer.
Do I need a Dutch oven to make this bread?
No — the bread bakes well on a parchment-lined baking sheet at 375°F. A Dutch oven produces a superior artisan crust because the covered environment traps steam that keeps the crust soft and extensible during the initial bake, allowing the bread to expand fully before the crust sets. If you have one, use it. If you don’t, the standard method produces an excellent loaf.
How do I know when the bread is done?
The most reliable method is an instant-read thermometer inserted in the center of the bottom of the loaf — 195 to 200°F means the interior is fully baked. Visual cues: deep golden brown all over, a hollow sound when you knock on the bottom of the loaf, and sides that look set and firm rather than soft. Color alone can be misleading — a thermometer removes all guesswork.
Tuscan Garlic Bread
Equipment
Ingredients
Roasted Garlic
- 1 large head garlic
- 1 teaspoon olive oil
Bread Dough
- 3½ cups bread flour
- 1¼ cups warm water 105–110°F
- 2¼ teaspoons active dry yeast 1 packet
- 1 tablespoon honey
- 2 teaspoons kosher salt
- 2 tablespoons olive oil
- Roasted garlic cloves mashed into a paste
- 1 tablespoon chopped fresh rosemary or 1 teaspoon dried
- 1 tablespoon chopped fresh parsley or 1 teaspoon dried
- 1 teaspoon Italian seasoning
- 2 tablespoons grated Parmesan cheese optional
Egg Wash (Optional)
- 1 egg
- 1 tablespoon water
Finishing
- 1 tablespoon melted butter or olive oil
- Light sprinkle of flaky sea salt
- Chopped parsley optional
Instructions
Roast the Garlic
- Preheat the oven to 400°F.
- Slice the top off the garlic head to expose the cloves. Drizzle with olive oil, wrap tightly in foil, and roast for 35–40 minutes until the cloves are soft and golden.
- Cool slightly, then squeeze the cloves into a small bowl and mash into a smooth paste.
Make the Dough
- In a large bowl combine:
- warm water
- honey
- yeast
- Allow to stand for about 5–10 minutes until foamy.
- Add:
- olive oil
- mashed roasted garlic
- rosemary
- parsley
- Italian seasoning
- Parmesan (if using)
- salt
- Mix well.
- Gradually add the bread flour until a soft dough forms.
- Knead for 8–10 minutes until smooth and elastic.
First Rise
- Place in a lightly oiled bowl.
- Cover and allow to rise for 60–90 minutes, or until doubled.
Shape
- Turn dough onto a lightly floured surface.
- Shape into a round boule or oval bâtard.
- Place on a parchment-lined baking sheet or in a lightly floured proofing basket.
- Cover and let rise another 30–45 minutes.
Bake
- Preheat oven to 375°F.
- If desired, brush with the egg wash for a shinier crust.
- Slash the top of the loaf 2–3 times with a sharp knife or bread lame.
- Bake for 35–40 minutes, until the loaf is deep golden brown and the internal temperature reaches 195–200°F.
Finish
- Brush the warm loaf lightly with melted butter or olive oil.
- Sprinkle with flaky sea salt and chopped parsley if desired.
- Cool on a wire rack for at least 30 minutes before slicing.
Notes
Store in an airtight bag at room temperature for up to 3 days.
Freeze whole or sliced for up to 3 months.
This Old Baker Tips
Fold in ½ cup shredded Parmesan or Asiago for extra savory flavor.
Add 2 tablespoons chopped sun-dried tomatoes for a Tuscan-inspired variation.
Serve with olive oil and balsamic vinegar for dipping, or use it for grilled panini or garlic toast.
If using a Dutch oven, bake covered for 25 minutes, then uncover and bake another 10–15 minutes for an artisan-style crust.

Leave a Reply