
Homemade dry roux is a game-changing pantry staple that adds rich, toasted flavor to your cooking while saving you time and effort. If you’ve ever stood over a stovetop whisking a bubbling mixture of flour and fat to make a traditional roux, you know it requires attention, patience, and the right timing to avoid burning. But did you know there’s a simpler, stress-free alternative that gives you all the flavor with none of the fuss?
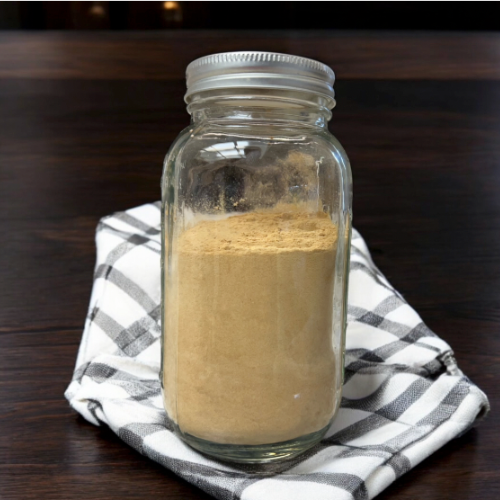
Homemade dry roux is nothing more than flour that’s been slow-toasted until it turns a deep golden or nutty brown. Unlike traditional roux, it doesn’t require oil or butter, and you can make a big batch ahead of time to keep on hand for soups, stews, gravies, and classic Southern dishes like gumbo and étouffée. Whether you’re gluten-free, looking to control your fat intake, or just want an easier route to bold flavor, dry roux checks every box.
What Makes Dry Roux So Special?
The magic of homemade dry roux lies in its depth of flavor. Slowly toasting flour transforms its character completely—from bland and powdery to nutty, warm, and complex. This toasted flour acts as both a flavor booster and a thickening agent, giving dishes body and richness without the need for added fat.
Another bonus? It’s shelf-stable. Once made, you can store homemade dry roux in a sealed jar in your pantry for up to 6 months, making it an ideal meal prep essential. It’s ready when you are—just scoop and stir into hot liquid and whisk until smooth.
Versatility at Its Best
Homemade dry roux is as versatile as it is easy to make. It works beautifully in:
- Gumbos and stews: Add that signature depth and color without standing over the stove.
- Gravies and sauces: Whisk into pan drippings or broth for smooth, lump-free results.
- Vegetarian dishes: Because it doesn’t require animal fat, it’s perfect for plant-based cooking.
- Fat-restricted diets: Get roux flavor and thickening power with zero added oil or butter.
You can even adjust the darkness of your dry roux depending on what you’re cooking. A lighter toast gives you a milder, more subtle flavor—great for creamy sauces. A deeper brown roux offers that unmistakable richness ideal for hearty gumbos and red beans.
How to Make It: Easier Than You Think
Dry roux can be made using the oven method or the stovetop method. Both work well, but the oven version is more hands-off and less likely to burn.
To make dry roux in the oven:
- Preheat your oven to 350°F (175°C).
- Spread 2 cups of all-purpose flour in an even layer on a rimmed baking sheet.
- Bake for 60 to 90 minutes, stirring every 15 minutes to toast evenly.
- When the flour turns a deep tan or light brown and smells nutty, it’s done.
- Let it cool, then transfer to an airtight container.
On the stovetop, use a heavy-bottomed skillet (like cast iron) and stir continuously over medium-low heat for 20 to 30 minutes. This method works faster but requires constant attention to prevent scorching.
Using Dry Roux in Everyday Cooking
Using your homemade dry roux is as simple as whisking it into a hot liquid. No oil, no lumps, no problem. You’ll want to use about:
- 1 tablespoon of dry roux per 1 cup of liquid for moderate thickening.
You can add it directly to simmering broth, soup base, or gravy liquid, whisking until smooth. It thickens quickly and evenly without needing to pre-mix with fat or water.
Because it’s pre-toasted, dry roux won’t develop any further color or flavor once added, so choose the toast level you want before storing it. A medium-brown roux is a good all-purpose choice if you’re making a batch to keep on hand.
Gluten-Free? No Problem
You can absolutely make dry roux with gluten-free flour alternatives. Rice flour, sorghum flour, and gluten-free all-purpose blends all toast well and provide similar thickening power. They may brown a bit differently than wheat flour, so watch closely and stir more often, especially on the stovetop.
This makes dry roux an excellent option for gluten-sensitive or celiac households who still want to enjoy traditional Southern dishes without compromise.
Pantry Staple Worth Keeping
If you’re looking to simplify your cooking routine without sacrificing flavor, homemade dry roux is a no-brainer. It’s low-cost, easy to make in bulk, and opens the door to countless rich, savory dishes. Once you try it, you may never go back to making a roux the old-fashioned way.
Whether you’re whipping up weeknight gravy or simmering a slow-cooked gumbo, dry roux delivers all the depth and comfort of traditional Southern cooking—without the time or hassle. Store a jar in your pantry, and you’ve got instant flavor at your fingertips. Find more helpful pantry mixes here.

Homemade Dry Roux
Ingredients
- 2 cups all-purpose flour unbleached preferred for flavor, but any works
Instructions
Oven Method (Easiest & Most Hands-Off)
- Preheat your oven to 350°F (175°C).
- Spread 2 cups of flour in an even layer on a large dry baking sheet (preferably rimmed to prevent spills).
- Bake for 60 to 90 minutes, stirring every 15 minutes to ensure even browning.
- The flour is ready when it reaches a deep tan or light brown color and smells nutty and toasty. Be patient—it should not burn.
- Let it cool completely, then store in an airtight container in a cool, dry place for up to 6 months.
Stovetop Method (Faster but More Hands-On)
- Place the 2 cups of flour in a large, heavy skillet (preferably cast iron).
- Cook over medium-low heat, stirring constantly with a wooden spoon or whisk.
- Continue stirring and toasting the flour for 20 to 30 minutes, until it turns a deep golden brown.
- Be careful not to walk away—flour can burn quickly if not stirred constantly.
- Let it cool, then transfer to a sealed jar or container.
How to Use:
- Replace equal amounts of flour called for in a roux-based recipe.
- To use in cooking, whisk into stock, broth, or liquid directly—no oil or butter needed.


Leave a Reply