

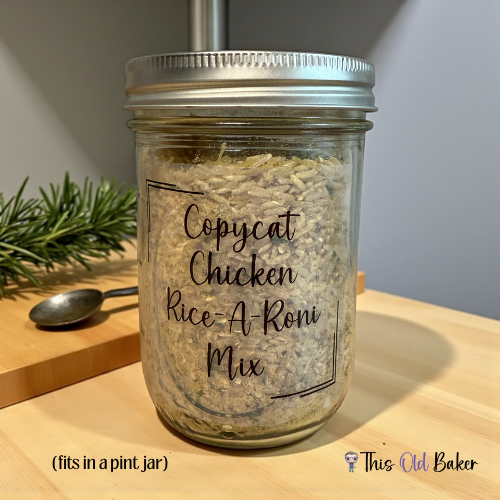
This is a pint jar of rice, broken vermicelli pasta, and a savory seasoning blend that makes a better side dish than the box it’s replacing. The jar sits on the pantry shelf until you need a quick side — then it’s butter in a skillet, two minutes of toasting, water in, lid on, done in 20 minutes. Four servings from one jar, from ingredients that cost pennies each.
The name change from copycat to rice pilaf mix matters because that’s what this actually is. A pilaf is rice toasted in fat before liquid is added — that toasting step is what produces the nutty, slightly caramelized flavor that makes this taste restaurant-quality rather than just seasoned rice. The box version always got credit for that flavor. Now you know where it actually comes from.
The Toasting Step — Don’t Skip It
Melt butter in a skillet over medium heat. Add the dry mix from the jar — rice, vermicelli, and all. Toast for 2 to 3 minutes, stirring frequently, until the vermicelli turns golden brown and the rice looks slightly opaque. You’ll smell it — a warm, nutty aroma that tells you it’s working.
This step is not optional and it’s not decorative. The Maillard reaction on the rice and pasta develops flavor compounds that don’t exist in untoasted grain. Without it, you’re making boiled seasoned rice. With it, you’re making rice pilaf. The difference in the finished bowl is significant and immediate.
The pasta toasts faster than the rice — watch it closely in the last 30 seconds and pull the pan from heat as soon as the vermicelli is golden, not dark brown. Dark brown vermicelli is bitter. Golden is exactly right.
What’s in the Jar
Long grain white rice is the base — it cooks evenly and produces separate, fluffy grains rather than a sticky clump. Broken vermicelli or thin spaghetti snapped into small pieces is the pasta element that gives this its pilaf character and the textural contrast that plain rice doesn’t have.
The seasoning blend: powdered chicken bouillon is the dominant flavor — savory, slightly salty, chicken-forward. Dried parsley, garlic powder, onion powder, black pepper, paprika, and optional celery seed round it out. The celery seed is small but distinctive — it adds a specific herbal background note that’s in the original and worth including if you have it.
Storing the Seasoning Separately
A reader asked about keeping the seasoning separate from the rice and pasta to save pantry space and allow for more flexible batch cooking. It’s a smart approach and fully supported by this recipe.
To do it: make a larger batch of the seasoning blend and store it in a small jar or sealed bag. Keep the rice and broken vermicelli in a separate container. At cooking time, measure out 1 cup rice, ½ cup broken vermicelli, and 2 tablespoons of the seasoning blend per batch. Same result, more flexibility — you can use the rice and pasta with different seasoning blends, or use the seasoning blend to flavor rice you’re cooking a different way.
This is also the better approach if you cook for varying household sizes. Instead of one pint jar = one batch, you have a bulk seasoning jar and bulk grains and you measure what you need.
The Cook Method
After toasting: pour in 2¼ cups of water. Bring to a boil, scraping up any toasted bits from the bottom of the pan. Cover, reduce heat to low, and simmer 15 to 20 minutes until the liquid is absorbed and the rice is tender. Don’t lift the lid during cooking — the steam is doing the work and releasing it slows the process.
When the liquid is absorbed, remove from heat and let the rice stand covered for 5 minutes. Then fluff with a fork. The stand time finishes the steam cooking and produces fluffier, more separate grains than serving immediately.
Broth Instead of Water
Substituting chicken broth for the water deepens the chicken flavor significantly — especially if you’re using low-sodium bouillon or a lighter seasoning hand. The broth adds a richness that water doesn’t, and the finished rice tastes more developed. Use the same 2¼ cup ratio. If using full-sodium broth with full-sodium bouillon, taste before adding any extra salt.
Making It a Meal
The pilaf as written is a side dish. It becomes a meal with protein added at two points: raw diced chicken thighs or breast pieces can be sautéed in the butter before the dry mix goes in — cook until no longer pink, push to the side, add the mix and toast around the chicken, then proceed as written. Or shredded rotisserie chicken, cooked shrimp, or diced ham stirred in during the last 5 minutes of simmering.
Frozen peas, corn, or diced carrots added in the last 5 minutes of cooking are the easiest vegetable additions — they thaw and heat through without requiring separate cooking or changing the liquid ratio.
Flavor Variations
Herb and garlic: double the garlic powder and add a teaspoon of dried Italian seasoning to the jar. The herbs bloom during the toast step and produce a more aromatic pilaf.
Lemon herb: add a teaspoon of lemon pepper seasoning and a half teaspoon of dried thyme. Finish the cooked pilaf with a squeeze of fresh lemon juice.
Southwestern: replace the parsley and celery seed with cumin, chili powder, and smoked paprika. Use chicken broth instead of water. Stir in a small can of green chiles at the end.
For a beef-flavored version of this same pilaf format, swap the chicken bouillon for Homemade Beef Bouillon Seasoning — thisoldbaker.com/vegan-beef-bouillon-seasoning at the same ratio. Pairs especially well with the Southwestern variation above.
Batch Making
One pint jar makes one batch of four servings. For a household that eats this regularly, making four to six jars at once is worth the setup time. Each jar takes about two minutes to fill. Label with the date and cooking instructions so it’s ready to grab without hunting for the recipe.
The companion recipe in this series — Rice-A-Roni Broccoli Cheddar Mix — thisoldbaker.com/copycat-rice-a-roni-broccoli-cheddar — uses the same technique with a completely different flavor direction. Both are worth keeping stocked.
Storage
Sealed pint mason jar in a cool dry pantry for up to 6 months. The dried bouillon and spices are the first to fade — if the jar smells less seasoned than when you made it, make a fresh batch. The rice and pasta themselves keep indefinitely; it’s the seasoning blend that has a shelf life.
Frequently Asked Questions
Why do you toast the rice and pasta before adding water?
Toasting in butter for 2 to 3 minutes is the step that produces the nutty, caramelized flavor that makes rice pilaf taste the way it does. The Maillard reaction on the rice and pasta develops flavor compounds that don’t exist in untoasted grain. Without the toasting step you’re making boiled seasoned rice. With it you’re making rice pilaf. The pasta should turn golden brown and the rice slightly opaque before the water goes in.
Can I store the seasoning separate from the rice and pasta?
Yes — it’s a smart approach for flexible batch cooking. Make a larger batch of the seasoning blend and store it separately. Measure 2 tablespoons of seasoning per batch at cooking time along with 1 cup of rice and ½ cup of broken vermicelli. This lets you use the same rice and pasta with different seasoning blends and scale up or down without being tied to the pint jar format.
Can I use chicken broth instead of water?
Yes — chicken broth deepens the flavor significantly and produces a richer finished pilaf. Use the same 2¼ cup ratio as water. If you’re using full-sodium broth alongside full-sodium bouillon, taste before adding any extra salt — the combination can be quite salty. Low-sodium broth is the safer starting point if you’re uncertain.
What pasta can I use instead of vermicelli?
Thin spaghetti snapped into small pieces is the most common substitute and works identically to vermicelli. Angel hair pasta also works. Orzo produces a slightly different texture — smaller pieces that blend more into the rice rather than staying distinct. Avoid thick pasta shapes or egg noodles, which cook at a different rate and produce uneven results.
How do I add protein to chicken rice pilaf mix?
Two approaches: sauté raw diced chicken in the butter before adding the dry mix — cook until no longer pink, push to the side, add the mix and toast around the chicken, then add water and proceed as written. Or stir in shredded rotisserie chicken, cooked shrimp, or diced ham during the last 5 minutes of simmering to warm through. The first method produces more deeply flavored chicken; the second is faster.
Can I make this gluten-free?
Yes — skip the vermicelli entirely and use all rice, or substitute a gluten-free small pasta like rice vermicelli or gluten-free orzo. Confirm your chicken bouillon is gluten-free — some brands contain wheat starch as a filler. All other ingredients (rice, spices, butter) are naturally gluten-free. The cooking method stays exactly the same.
Copycat Chicken Rice-A-Roni
Equipment
Ingredients
- 1 cup long grain white rice
- ½ cup broken vermicelli pasta or thin spaghetti, snapped into small pieces
- 2 tablespoons powdered chicken bouillon
- 1 teaspoon dried parsley
- ½ teaspoon garlic powder
- ½ teaspoon onion powder
- ¼ teaspoon celery seed optional but classic!
- ¼ teaspoon black pepper
- ½ teaspoon paprika
Instructions
- Layer rice and pasta first, then whisk the seasonings together in a small bowl and pour over top for a neat look.
- To Cook
- Melt 2 tablespoons butter in a skillet.
- Add jar mix and sauté over medium heat for 2–3 minutes until pasta is golden.
- Stir in 2 ¼ cups water. Bring to boil.
- Cover, reduce heat, and simmer 15–20 minutes until rice is tender and liquid absorbed.
- Fluff with fork and serve!


Leave a Reply