

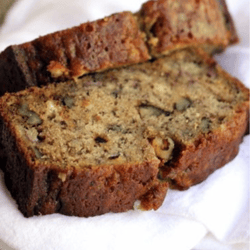
Banana nut bread is one of those timeless recipes that feels like it’s always belonged on the kitchen counter. Whether it’s fresh out of the oven or wrapped in foil for tomorrow’s breakfast, it brings warmth, comfort, and a sense of home with every slice. Moist, subtly sweet, and studded with crunchy nuts, this classic quick bread is a beloved staple that never goes out of style.
Chances are, you’ve had some version of banana nut bread in your life. Maybe it was your grandma’s go-to bake with overripe bananas. Maybe it was the recipe you first tried as a beginner baker. Or maybe it’s the dependable loaf you turn to when your fruit bowl has one too many soft bananas. No matter how you came to love it, banana nut bread has a way of sticking around—for good reason.
The Heart of a Classic
At its core, banana nut bread is about simplicity. It’s made with humble, everyday ingredients—ripe bananas, flour, eggs, sugar, butter, and of course, a generous handful of chopped nuts. There’s no fancy technique required, no special equipment beyond a mixing bowl and loaf pan. It’s approachable, adaptable, and always rewarding.
And let’s talk about flavor. The bananas provide natural sweetness and moisture, while the nuts (most often walnuts or pecans) bring texture and a slightly toasty depth that balances the softness of the bread. The result is a loaf that’s tender and rich, without being overly sweet or heavy.
It’s the kind of treat that works just as well for breakfast as it does for dessert—especially when spread with a bit of butter, cream cheese, or even a drizzle of honey.
Customizing to Suit Your Taste
One of the best things about banana nut bread is how flexible it is. Once you’ve mastered the base, the options for customizing are nearly endless. You can tweak the recipe to match your pantry, your cravings, or your dietary needs—without compromising on that comforting, homemade flavor.
Here are just a few popular ways to switch it up:
1. Change Up the Nuts
Walnuts and pecans are traditional, but don’t be afraid to branch out. Try chopped almonds for a firmer crunch, hazelnuts for a hint of sweetness, or macadamia nuts for a buttery bite. Toasting the nuts before folding them into the batter can enhance their flavor even more.
2. Add Chocolate
Bananas and chocolate are a match made in heaven. Toss in a handful of chocolate chips or chunks—milk, dark, or white—for a more decadent loaf. It’s a great way to turn banana bread into a dessert-style treat without too much extra effort.
3. Mix in Fruit or Spices
Raisins, cranberries, shredded coconut, or chopped dates can all add extra texture and interest. For a flavor twist, try adding warm spices like cinnamon, nutmeg, or even cardamom. A teaspoon of vanilla extract (or a splash of bourbon, if you’re feeling adventurous) can deepen the flavor beautifully.
4. Make It Healthier
Looking for a more nutritious version? Swap some or all of the white flour for whole wheat. Use maple syrup or honey instead of refined sugar, or incorporate Greek yogurt or applesauce to reduce the fat content. Many banana bread recipes can also be made gluten-free or dairy-free with a few easy substitutions.
5. Try a New Format
Banana nut bread doesn’t have to be baked in a loaf pan. Try making muffins, mini loaves, or even baking the batter in a bundt pan for a brunch-ready centerpiece. Smaller portions also mean quicker baking times and more options for freezing or gifting.
Baking with Purpose
There’s something deeply satisfying about using up ingredients that might otherwise go to waste. Banana nut bread is a perfect example of how baking can be both resourceful and rewarding. Those overripe bananas sitting on the counter—the ones with the spots you’d normally pass over—are actually the secret to the best banana bread. The riper the banana, the more intense the flavor and moisture.
This makes banana nut bread a smart and sustainable option for reducing food waste. And in a world that often feels fast-paced and wasteful, taking the time to bake something meaningful and practical feels like a small act of care—both for yourself and the world around you.
A Loaf That Connects Generations
There’s a reason banana nut bread recipes are so often passed down from one generation to the next. It’s more than just a sweet loaf—it’s a memory. A scent that fills the kitchen with comfort. A recipe scribbled on a worn notecard. A tradition of sharing slices with neighbors, friends, and loved ones.
Maybe your family makes it with a secret spice or a special topping. Maybe it’s wrapped in foil and stored in the freezer for when company comes. Or maybe it’s just your go-to when you need a taste of something familiar.
No matter how you enjoy it, banana nut bread is the kind of recipe that invites you to slow down, bake from the heart, and savor the little things.
The Comfort of Something Homemade
In the end, banana nut bread is more than the sum of its ingredients. It’s a reminder that baking doesn’t have to be complicated to be meaningful. With just a few ripe bananas and a handful of pantry staples, you can make something warm, nourishing, and comforting—a loaf full of flavor, history, and heart.
So the next time your bananas start to turn, don’t toss them—transform them. Whip up a loaf, get creative with the mix-ins, and enjoy the simple pleasure of a classic treat that never goes out of style.
Banana Nut Bread
Ingredients
- 2 cups all-purpose flour
- 1½ teaspoons baking soda
- Pinch salt
- 1 cup granulated sugar
- ½ cup vegetable oil
- 2 eggs
- 1 teaspoon vanilla extract
- 1/2 teaspoon cinnamon
- 1/2 teaspoon nutmeg
- 4 medium ripe bananas mashed about 1⅓ cups or 303 grams
- 1 cup coarsely chopped walnuts
Instructions
- Preheat oven to 350 degrees F. Grease two 8×4-inch loaf pans; set aside.
- In a medium bowl, whisk together the flour, baking soda, cinnamon, nutmeg and salt; set aside. In a large bowl, whisk together the sugar, oil, eggs, and vanilla extract. Add the bananas and stir gently to combine. Add the flour mixture and stir until completely blended. Using a rubber spatula, fold in the walnuts.
- Divide the mixture into the two loaf pans. Bake for 35 to 45 minutes, or until a thin knife inserted into the center comes out clean. If the loaves begin to get too dark before they are done in the middle, cover with foil. Allow to cool in the pans for 10 minutes, then turn out onto a wire rack to cool completely. The bread can be stored, wrapped tightly in plastic wrap, at room temperature for up to 5 days. To freeze, wrap in plastic wrap then in aluminum foil and freezer for up to 3 months


One response
This bread is moist and flavorful even several days after baking! If my grandkids are here, it won’t last but one day.