

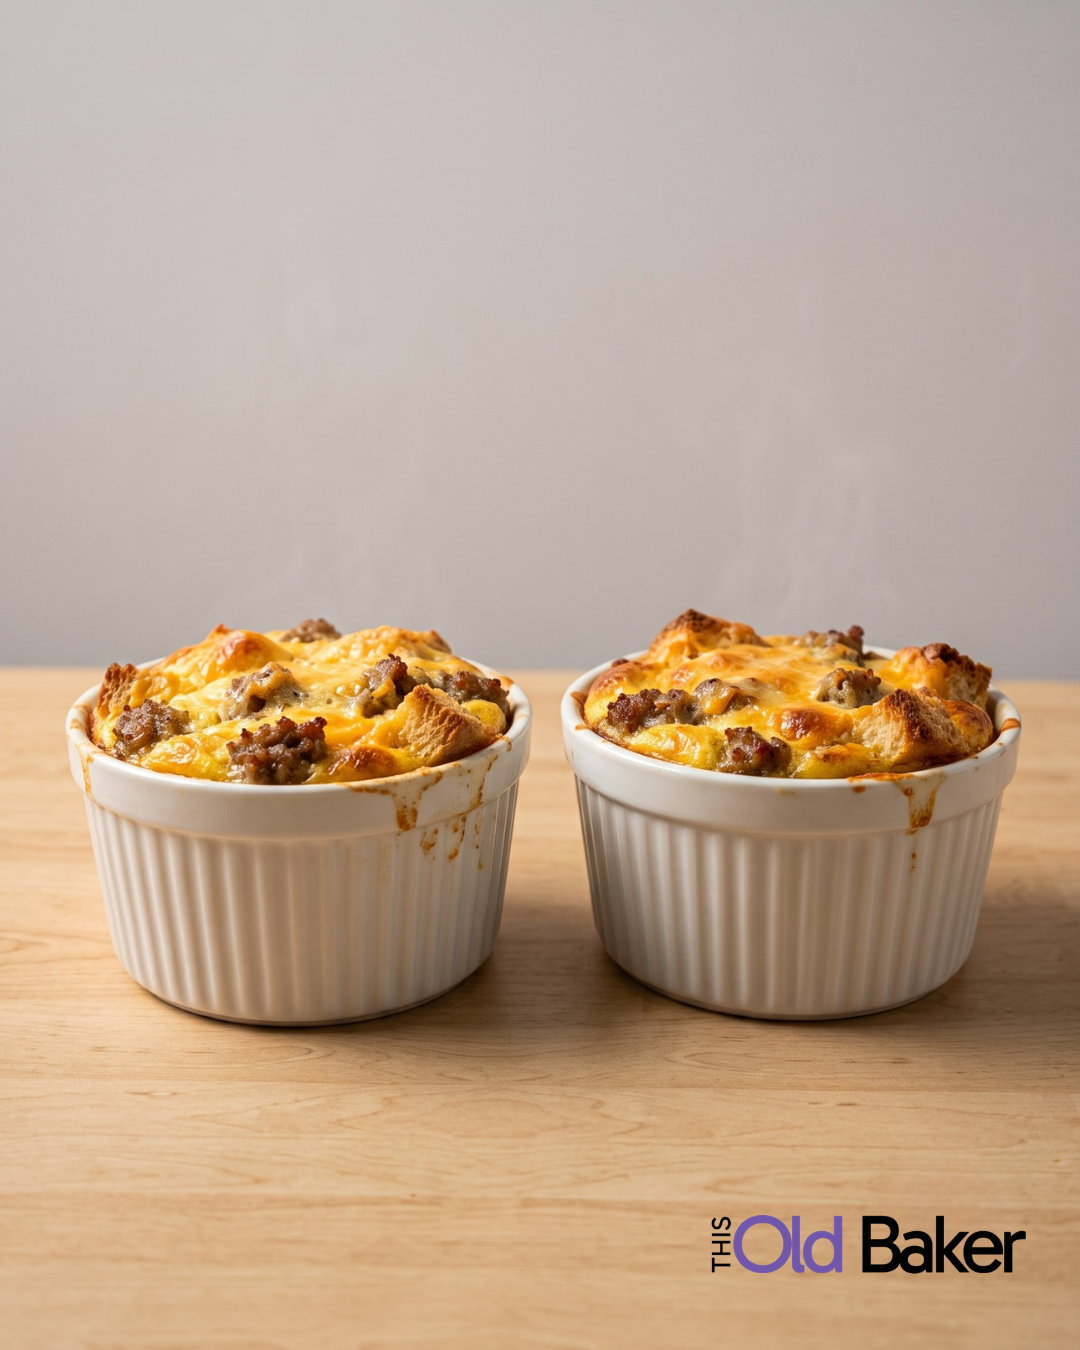
A full-sized chicken pot pie is a project — a deep dish, a top and bottom crust, enough filling for six people, and a recipe that doesn’t really shrink down without a lot of guesswork. This version skips all of that. Two individual ramekins, one crust on top only, and a filling that comes together in one skillet in about ten minutes. The kind of pot pie you can actually make on a Tuesday for one or two people without overthinking it.
It’s everything you want from chicken pot pie — the flaky crust, the creamy herbed filling, the steam that hits you when you crack it open — scaled down to exactly what two people need, with no leftover pie sitting in the fridge for a week. If you ever want to make the full-sized version for a crowd, Classic Chicken Pot Pie Scratch Made — https://thisoldbaker.com/classic-chicken-pot-pie-scratch-made is the recipe for that.
Why Individual Ramekins Work Better for Small Batch
A single small pie dish holding two servings of filling under one crust sounds simpler, but it actually creates problems — the crust-to-filling ratio gets thrown off, and cutting clean portions out of a small dish is messier than it should be. Two individual ramekins solve both issues. Each one gets its own properly proportioned crust, its own clean presentation, and you’re not trying to divide a single dish evenly down the middle.
It also means if you’re cooking for one, you can bake one now and freeze the second unbaked for later — which isn’t really possible with a single shared dish.
One Crust, Not Two
This recipe uses a top crust only — no bottom crust under the filling. That’s intentional, not a shortcut. A bottom crust under a wet, creamy filling almost never gets fully crisp; it ends up soggy by the time the top is properly golden. Skipping it means every bite has crust where crust actually works, and the filling stays the star.
One refrigerated pie crust gives you more than enough for two ramekin-sized rounds, with extra leftover. Save the rest, well-wrapped, for a second small batch later in the week, or use the scraps for a quick cinnamon-sugar twist while the oven’s still hot.
The Filling — Built in One Skillet
Butter, diced onion, celery, and carrot soften together first — this is the classic mirepoix base that gives pot pie its foundational flavor, just scaled down to a quarter cup each. Garlic goes in at the very end of that step; it burns fast and only needs thirty seconds.
Flour sprinkled over the softened vegetables and cooked for a full minute before any liquid goes in is the step that gets skipped too often. That minute cooks out the raw flour taste and starts building the roux that thickens the filling. Skip it and the filling tastes chalky no matter how long it simmers afterward.
Broth goes in first, whisked in slowly so it doesn’t clump against the roux, then the milk. Let it simmer until it visibly thickens — three to four minutes — before adding the chicken and peas. Peas go in at the very end with everything else, not earlier; there’s no long cook time here to worry about, but adding them last keeps them bright and intact rather than breaking down into the sauce.
Rotisserie Chicken Is the Right Shortcut
This recipe calls for one cup of cooked chicken, and rotisserie is the easiest way to get there for a small batch — you use a fraction of the bird and have the rest for sandwiches or another meal later in the week. Diced or shredded both work; shredded soaks up a little more of the sauce, diced holds a slightly firmer bite. Either way, it’s already cooked, which means the filling comes together in the time it takes the oven to preheat.
Sealing and Venting the Crust
Roll the crust just enough to cut two circles slightly larger than the ramekin tops — you want a little overhang to press against the rim so the crust holds its shape rather than shrinking back during baking. Press gently around the edge; you’re not trying to crimp it tight, just secure it enough that it doesn’t slide.
Cut two or three small slits in the top of each before baking. The filling is hot and steamy going into the oven — without a vent, that steam has nowhere to go and the crust can puff unevenly or split somewhere you didn’t intend. A few clean slits with a paring knife control where the steam escapes instead.
The egg wash is what gets you the deep golden color rather than a pale, flat crust. Brush it on evenly right before baking, not earlier — egg wash that sits too long before the oven can go gummy instead of glossy.
Baking and Resting
400 degrees, 25 to 30 minutes, until the crust is a deep golden brown and you can see the filling bubbling at the slits. That bubbling is the real done signal — a crust can look golden before the filling underneath is fully hot, so look for both.
Let them stand five to ten minutes before serving. The filling is essentially a thickened sauce straight out of the oven, and it needs that rest to settle and stop being lava-hot. Cutting in too early means a thinner, runnier first bite than the one you’ll get after the rest.
Swaps Worth Making
Corn or green beans work in place of the peas if that’s what’s in the freezer or what your household actually prefers. A pinch of poultry seasoning stirred in with the thyme and parsley pushes the filling toward a richer, more old-fashioned flavor without changing anything about the method.
If your ramekins run larger than 10 ounces, expect a thinner filling layer under the crust and add a few extra minutes of bake time to make sure the center catches up to the browned top.
Storage
Refrigerate leftovers up to three days. Reheat in a 350-degree oven until warmed through rather than the microwave — the oven keeps the crust closer to flaky, while the microwave turns it soft and a little chewy. These genuinely taste best the day they’re made, but a properly reheated one the next day is still good.
Freezing for Later
Make just the filling ahead, divide it into freezer-safe ramekins, cool completely, wrap well, and freeze up to three months. When you’re ready, thaw overnight in the refrigerator, top with a fresh round of crust, brush with egg wash, and bake as directed. Freezing the filling without the crust on it is what keeps the crust from going soggy in storage — top it fresh every time and you get the same result as a from-scratch pie.
If you’d rather keep this in soup form instead of baking a crust, my https://thisoldbaker.com/small-batch-crockpot-chicken-pot-pie-soup has the same comfort in a bowl, with a biscuit on top instead of pie crust.
Frequently Asked Questions
Why does this small batch pot pie only have a top crust?
A bottom crust under a wet, creamy filling rarely crisps properly — it ends up soggy by the time the top crust is golden. Using only a top crust means every bite has crust where it actually works, and it also simplifies the recipe significantly for a small batch, since you’re not rolling and fitting two layers into individual ramekins.
Can I use rotisserie chicken in small batch chicken pot pie?
Yes — rotisserie chicken is the easiest way to get the one cup of cooked chicken this recipe needs, and it means the filling comes together in the time it takes the oven to preheat. Diced or shredded both work; shredded absorbs slightly more of the sauce while diced holds a firmer bite.
Why do you cook the flour before adding the broth?
Cooking the flour with the vegetables for about a minute before adding any liquid removes the raw, chalky flour taste and starts building the roux that thickens the filling. Skipping this step or rushing it is the most common reason a pot pie filling tastes underdeveloped no matter how long it simmers afterward.
Why do you cut slits in the pie crust before baking?
The hot, steamy filling needs somewhere for that steam to escape as it bakes. Without a vent, steam can build up under the crust and cause it to puff unevenly or split unpredictably. A few clean slits cut with a paring knife control where the steam releases and help the crust bake more evenly.
Can I freeze chicken pot pie for two ahead of time?
Yes — freeze just the filling, not the assembled pie. Divide the cooled filling into freezer-safe ramekins, wrap well, and freeze up to three months. Thaw overnight in the refrigerator, then top with a fresh round of pie crust and egg wash before baking. Freezing the filling without the crust already on it is what keeps the finished crust flaky rather than soggy.

Small Batch Chicken Pot Pie for Two
Equipment

Ingredients
- 1 tablespoon butter
- ¼ cup diced onion
- ¼ cup diced celery
- ¼ cup diced carrots
- 1 clove garlic minced
- 2 tablespoons all-purpose flour
- ¾ cup chicken broth
- ¼ cup whole milk or half-and-half
- 1 cup cooked chicken diced or shredded
- ¼ cup frozen peas
- ½ teaspoon dried thyme
- ¼ teaspoon dried parsley
- Salt and black pepper to taste
Crust
- 1 refrigerated pie crust you’ll only use part of it
- 1 egg beaten (for egg wash)
Instructions
- Preheat the oven to 400°F. Lightly grease two 10-ounce ramekins.
- Melt the butter in a skillet over medium heat. Add the onion, celery, and carrots. Cook for 5–6 minutes until the vegetables begin to soften. Stir in the garlic and cook for 30 seconds.
- Sprinkle the flour over the vegetables and cook for 1 minute, stirring constantly.
- Slowly whisk in the chicken broth, followed by the milk. Cook until the sauce thickens, about 3–4 minutes.
- Stir in the chicken, peas, thyme, parsley, salt, and pepper. Simmer for 2 minutes, then remove from the heat.
- Divide the filling evenly between the prepared ramekins.
- Roll out the pie crust and cut two circles slightly larger than the tops of the ramekins. Place a crust over each ramekin and gently press around the edges. Cut a few small slits in the tops to vent steam.
- Brush with the beaten egg.
- Place the ramekins on a baking sheet and bake for 25–30 minutes, or until the crust is deep golden brown and the filling is bubbling.
- Let stand for 5–10 minutes before serving.
Notes
Swap the peas for corn or green beans if preferred.
Add a pinch of poultry seasoning for a richer homemade flavor.
If your ramekins are larger than 10 ounces, you’ll have a slightly thinner filling layer and may need a few extra minutes of baking time.
Storage Refrigerate leftovers for up to 3 days. Reheat in a 350°F oven until warmed through. These are best enjoyed fresh, as the crust stays flakier than when microwaved. Freezer Instructions Prepare the filling and divide it into freezer-safe ramekins. Cool completely, wrap well, and freeze for up to 3 months. When ready to bake, thaw overnight in the refrigerator, top with fresh pie crust, brush with egg wash, and bake as directed.

Leave a Reply